Showing posts with label web. Show all posts

Monday, May 17, 2010

Web Based Time Tracking – Software for Geeks #2


Time Tracking - ClockAs part of Software for Geeks on-going series, earlier I wrote about Web based To-Do List Software. In this post, let us review about Web based time tracking software. For geeks to be ultra efficient and productive, it is very important to cut down the time spent on activities that are not aligned with your goals. If you track daily activities either manually or using some software, you will be surprised to find out how much time your may be spending on activities that don’t need such attention. Take a test drive of the following two free online time tracking software and pick the one that suites your need.

1. SlimTimer

SlimTimer Logo
  • If you like simplicity, you should try SlimTimer. The user interface is very clean and has only the necessary items required to track your tasks and time.
  • Open the slimtimer either in a sleek browser pop-up or on the browser side-bar.  Click on a task to start the clock and click again to stop the clock. This displays both the cumulative time spent on a particular task and the current running time. Click the check-box next to the task once you area completely done with the task. It sends the updates about the time to the server every 10 minutes.
  • When a task is running, you can create a tag for the current running time-slice of that particular task. So, within one task you can have as many tags as you would like. This is much useful than trying to organize it with the Project, Client, Task hierarchy.
  • There are lot of additional features available such as sharing your tasks with others, generate powerful reports etc.
  • The most simple and extremely useful feature is that it displays the running timer and the task name on the browser window title.  So, when you minimize the pop-up, you can see the timer running on the task bar in the format of |time|task name. In the following screen shot, “Site Layout Change” task is selected. In the browser window title, it displays “|11:36|Site Layout Change”. When you minimize the window, you can tell how much time was spent on your current task without opening this window by looking at the task bar.
SlimTimer Pop-up Window
Fig 1:  SlimTimer Window

2. Toggl

Toggl Logo
  • You can maintain the Project, Client, Task, Time relationship usingToggl. Before you start the timer for a task, you should create a project and associate with a particular client. Please note that the client is mandatory. So, you can create a client called ‘Myself’ to track your personal projects and tasks.
  • This also opens up a sleek browser pop-up from where you can start your timer for a particular task by clicking on it. This pop-up displays all the projects and their associated tasks, which can get little cluttered if you have too many projects/tasks. You have the ability to search for a specific task directly from the timer pop-up window.
  • This has additional features to effectively collaborate between different teams and customers. There is also a desktop version of Toggl available for windows only, which requires .NET framework 2.0.
Toggl pop-up Window
Fig 2:  Toggl Window

On a final thought, I strongly recommend that you give some serious thought about the way you spend your time everyday. Track your time for a week, using one of the above web based time tracker and review where you are spending your time. Eliminate all the time-wasters and focus on completing projects and tasks that are meaningful to you and aligned with your goals.

Web based To-Do List – Software for Geeks #1


I will be posting “Software for Geeks” series on an on-going basis. Every post in this series will be about a specific type of software. Let us review the following five different free web based to-do list software in this post.
Geeks have several new technologies to explore and cool gadgets to play with. Managing the tasks and the list of things to do effectively is a boring and important part of Geek’s life. Take a test drive of all of these five softwares and choose the one that best fits your needs. Just testing these software and exploring their features is the fun part.
Apart from adding the tasks directly from the UI, you can also send an email that will create the tasks automatically. This feature is very handy if you have the ability to send emails from your mobile. You can also create multiple lists/categories. For e.g. If you are using GTD productivity framework, you can create @Errands, @Home, @Work lists.  When the task is due, it can send reminders to email, SMS or IM. You can also share the tasks with somebody else.  Remember the milk has lot of features and you may have to spend few minutes to really understand how to use the application.
You can manage the tasks from the browser even when you are not connected to Internet. When you connect back to Internet all your offline updates to the tasks will be synchronized automatically to the server. This is done using the Google gears.
(2)  Ta-da List
Ta-da ListsIf you like simplicity, you should definitely check this out. This is a very simple and easy to use to-do list. Nothing more and nothing less. You can create a task online, group them in lists, email the lists and share it with friends.
(3) Gubb
GubbGubb has very colorful UI. Like other to-do list software, this also lets you create list, share and email list. This also has the ability to assign a due-date, request a copy of the list from your email and set different color for every list. Apart from giving different color to every list, you can also rearrange the list on the home page.
(4) Bla-Bla List

Like Ta-da list, Bla-Bla list is also very simple to use. This has only the features that you really need to use. The UI is little boring and dull on this one. This uses adobe flash player.
(5) iGoogle
iGoogleI just wish Google develops a full blown task management software. If you use iGoogle, a simple solution is to add the very simple and functional To-Do list gadget provided by Google on your iGoogle home page.
As a final thought, getting things done was never about the tools or the software. You can be very effective just by using pen and paper to manage your tasks. So, don’t get trapped into using the different fancy features of all the web based to do softwares, as many of those features are time wasters. Just use the features that you need the most and focus on doing your tasks and get it done.
There are several other web based To-Do List software available. Which is your favorite one and why?

6 Steps To Transfer Domain Name to New Registrar

If you have more than one domain name, consolidating to a single registrar is a preferred approach. This article will explain the high level steps to transfer a domain name from one registrar to another. In this example, I transfered a domain name from Network Solutions (current registrar) to Go Daddy (new registrar).


1. Purchase and request domain transfer at the new registrar

When you purchase a domain transfer, some of the registrars may let you to keep all the time remaining on your existing registration, plus you may get a FREE 1-year extension. After the payment is processed, the status of the domain at the new registrar will be set to Authorization Required. You will also receive an email from the new registrar containing Transaction ID and Security Code.

2. Request authorization code at current registrar.

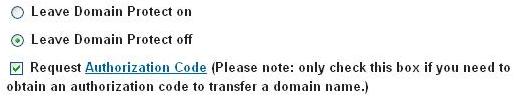
Login to your current registrar account and request for “authorization code request”.  You have to turn off the domain protection before you can request authorization code from the current registrar. Following screen shows the link from my current registrar that gave the option to request authorization code.
Request Authorization Code

3. Authorization code received from current registrar.

You’ll receive an email from current registrar with Authorization code.
We received your authorization code request on 07/02/2008
for your domain name thegeekstuff.com.
Your authorization code is: 12345678911

4. Begin the transfer from the new registrar using the authorization code.

Go to the new registrar and begin the transfer process. At this stage, the new registrar will display the Status as “Authorization required” and the Recommended Action as “Authorization – Begin transfer authorization”
Begin Transfer Authorization

Fig: Domain Status at new registrar before the transfer process
Enter the authorization code that was received from the current registrar and complete this process. After this step, the new registrar will display the Status as “Pending Current Registrar approval” and the Recommended Action as “Accept transfer at current registrar”
Domain Transfer Started
Fig: Domain status at new registrar after the transfer process is initiated

5. Email Notification from current registrar.

You will get an email from the current registrar confirming your transfer request. You don’t need to take any action if you want to accept the transfer. If you wish to cancel the transfer, follow the link from the email.
We received notification on July 1, 2008 7:21:44 PM EDT that you have requested to transfer
to another domain name registrar. If you would like to proceed with this transfer you do
not need to respond to this message. If you wish to cancel the transfer please contact
us before July 5, 2008 7:21:44 PM EDT by visiting our secure website https://

If we do not hear from you by July 5, 2008 7:21:44 PM EDT, this transfer will proceed.
We are committed to providing you with the solutions, services, and support to help
you succeed online. We hope to continue serving you in the future.

6. Domain Transfer completed to new registrar

A final confirmation email from new registrar was received approximately 4 days after initiating the transfer at the current registrar. Please note that the current registrar has up to 5 days to release the transfer of the domain

References:

ICANN – Internet Corporation for Assigned Names and Numbers, coordinates the domain name across the internet to make sure they are unique.  FAQ for Domain-Name Holders clarifies lot of questions about domain name transfer.
 
If you’ve transfered a domain name to a new registrar, please share your experience. If you are planning to transfer your domain name to a new registrar, what is your primary reason for transferring?

Gone in 60 Seconds – Find Disappeared Internet Pages

disappear
Photo courtesy: aliasgrace
While internet is not as smart as Angelina Jolie to make a website or a webpage disappear in 60 seconds, it still somehow manages to make some of the webpages disappear after a while.
When you come across something interesting over the internet, you may either bookmark it locally or in a social bookmarking site for later use. I’m sure several times you might have seen one of those websites in your bookmark just disappears.
In this article, let us review few methods on how to find a website or a webpage that you’ve bookmarked disappears from the internet.

1. Google Cache for the Rescue

Google caches all the websites that it crawls (except for those website that sets no cache in their robot tag).  So, when a website/URL you are looking for says ‘page not found’, get that page from the google as shown below.
When you know the URL, go to google.com and enter cache:URL as shown below. Please note that there is no space between cache and URL.
Syntax:
cache:URL
For example, go to google.com and enter the following:
cache:http://www.thegeekstuff.com/vim-101-hacks-ebook/
When you are searching for something in google.com,  if a particular link displays page not found message, then click on the cache link in the search result page shown.
Google Cache
Fig: Google Cache link in the search result page

2. Internet Archive – Way back machine.

wayback_logo_smarchive.org, stores several version of a web page. So, you can go and check how a particular website or URL looked like a while back. It currently has more than 150 billion pages.
From archive.org website:
The Internet Archive Wayback Machine is a service that allows people to visit
archived versions of Web sites. Visitors to the Wayback Machine can type in
a URL, select a date range, and then begin surfing on an archived version of
the Web. Imagine surfing circa 1999 and looking at all the Y2K hype, or
revisiting an older version of your favorite Web site. The Internet Archive
Wayback Machine can make all of this possible.

3. Save Web Pages for Offline Use

Scrapbook Fire-fox add-onIf you really like a website / URL that you are visiting, you may probably want to save the page content along with the bookmark.
Scrapbook fire-fox add-on is my personal favorite that I use every day. Scrapbook is mentioned in our earlier 7 Powerful Firefox Bookmark Add-ons article.
There are other web-clipping online services, which allows you to clip full or part of the website, organize the content you’ve clipped, assign tags etc., — icyteclipmarks and evernote are few of them.

4. Automatically Display Cache Links inside 404 Page Not Found

Errorzilla is a fire-fox add-on that will automatically display links to Google Cache, archive.org — when you hit “page not found”.
errorzilla
Fig: Useful error page by ErrorZilla

The Ultimate Guide for Creating Strong Passwords

The Ultimate Guide for Creating Strong Passwords


Strong Password
 
“Treat your password like your toothbrush. Don’t let anybody else use it, and get a new one every six months” – Clifford Stoll
 
When you create an account on a website, you may have the “password dilemma” for a second. The dilemma is whether you should provide a weak password that is easy to remember or a strong password that is hard to remember. Following are the rules and guidelines that may help you in overcoming the password dilemma and help you in creating a strong password that are secure. These are the things that I’ve used over years based on my own interest in the area of keeping the password safe and secure.

I. Two essential password rules:

Following two rules are bare minimal that you should follow while creating a password.

Rule 1 – Password Length: Stick with passwords that are at least 8 characters in length. The more character in the passwords is better, as the time taken to crack the password by an attacker will be longer. 10 characters or longer are better.
Rule 2 – Password Complexity: Should contain at least one character from each of the following group. At least 4 characters in your passwords should be each one of the following.
  1. Lower case alphabets
  2. Upper case alphabets
  3. Numbers
  4. Special Characters
I call the above two rules combined as “8 4 Rule” (Eight Four Rule):
  • 8 = 8 characters minimum length
  • 4 = 1 lower case + 1 upper case + 1 number + 1 special character.
Just following the “8 4 Rule” will be a huge improvement and instantly make your password much stronger than before for most of you who don’t follow any guidelines or rules while creating a passwords. If your banking and any financially sensitive website passwords doesn’t follow the “8 4 Rule”, I strongly suggest that you stop everything now and change those passwords immediately to follow the “8 4 Rule”.

II. Guidelines for creating strong passwords:

  1. Follow “8 4 Rule”. Like I mentioned above this is the foundation of creating a strong password.
  2. Unique Characters. Should contain at least 5 unique characters. You already have 4 different character if you’ve followed “8 4 Rule”.
  3. Use Password Manager. Strong passwords are hard to remember. So, as part of creating a strong password you need a reliable and trustworthy way of remembering the strong password. Using password management tool to store passwords should really become a habit. Anytime you create a password, note it down on a password manager tool, that will encrypt the password and store it safe for you. I recommend Password Dragon (Shameless plug. I’m the developer of this software), a free, easy and secure password manager that works on Windows, Linux and Mac. This can also be launched from the USB drive. There are lot of free password manager tools available, choose the one that best suites your taste and use it.
  4. Use Passphrase. If you don’t want to use password management tool, Use Passphrase to easily remember the passwords. You can use initials of a song or a phrase that are very familiar to you. for e.g. “Passwords are like underwears, change yours often!” phrase can be converted to a strong password “Prlu,Curs0!”

III. Guidelines for avoiding weak passwords.

Avoid the following in your passwords. Even part of your passwords should not be anything in the following items.
  1. Password same as username or part of the username
  2. Name of family members, friends or pets.
  3. Personal information about yourself or family members. This includes the generic information that can be obtained about you very easily, such as birth date, phone number, vehicle license plate number, street name, apartment/house number etc.
  4. Sequences. i.e consecutive alphabets, numbers or keys on the keyboard. for e.g. abcde, 12345, qwert.
  5. Dictionary words. Dictionary words with number or character in front or back
  6. Real word from any language
  7. Word found in dictionary with number substitution for word look alike. for e.g. Replacing the letter O with number 0. i.e passw0rd.
  8. Any of the above in reverse sequence
  9. Any of the above with a number in front or back.
  10. Empty password

IV. Common sense about passwords:

All the following points are nothing new and very much common sense. But most of the time, we tend to ignore these items.
  1. Create unique password every time. When you are changing a password for an existing account, it should not be the same as the previous password. Also, do not use incremental passwords while changing it. i.e password1, password2 etc.
  2. Change your passwords for all your accounts once every 6 months. Since passwords have a fixed length, a brute-force attack to guess the password will always succeed if enough time and processing power was available to the attacker. So, it is always recommended to change the passwords often. Schedule an recurring appointment on your calendar to change your passwords once every 6 months.
  3. Never write down your passwords. Creating a very strong password and writing it down on a paper is as bad as creating an easy to remember weak password and not writing it down anywhere. There are several interesting surveys done on this subject, where it was found that several people write down the password and keep it somewhere next to the computer. Some of them think keeping the post-it note below the mouse pad is secure enough. You should never write down the password on a paper. If you want to carry your password along with you all the times, use a password manager tool that runs from USB stick and take that with you all the times.
  4. Don’t share with anyone. Anyone includes your friends and family. Probably you might have heard the phrase “Passwords are like underwear, don’t share with anybody”. We teach our kids several things in life. Teaching them about online safety and not sharing the password with anybody should be one of them.
  5. Never keep the same password for two different sites. It is very tempting to create one set of passwords for all your emails, another password for all the banking sites, another password for all the social networking sites etc. Avoid this temptation and keep unique passwords for all your accounts.
  6. Don’t type your password when someone is looking over your shoulder. This is especially very important if you type slowly and search for the letters in the keyboard and type with one finger, as it is very easy for someone looking over your shoulder to figure out the password.
  7. Never send your password to anybody in an email. If you follow #3 mentioned above, this should not be an option. But the reason I’m specifically saying about this is because several hackers send emails as a support person and asking for your user name and password through email. Legitimate website or organization will never ask you for your user name and password either via email or over telephone.
  8. Change password immediately when they are compromised. Even if you have the slightest doubt that someone might have stolen your password, change it immediately. Don’t even waste a minute.
  9. Don’t use the “Remember password” option on the browser without setting the Master Password. Don’t use this feature of the browser to store your username and passwords without enabling the “Master Password” option. If you don’t set master password on the firefox browser, anybody who uses your firefox browser can see all the passwords that are stored in the firefox browser in plain text. Also, be very careful with this option and say ‘Not Now’ in the remember password pop-up, when you are using a system that doesn’t belong to you.
  10. Don’t type your password on a computer that does not belong to you. If possible, don’t use someone else computer that you don’t trust to login to any website, especially to very sensitive website such as banking. It is a very common practice for hackers to use key loggers that will log all the key strokes on a system, which will capture everything you type including the passwords.